An FTTP install in Australia mostly happens to you. The NBN technician does almost all the work. Your job is to be home for the appointment, decide where the white box goes on a wall, and plug your own router in afterwards. This is the guide for what to expect on install day, how to read the lights on the box once it’s mounted, and how to set things up when the tech leaves.
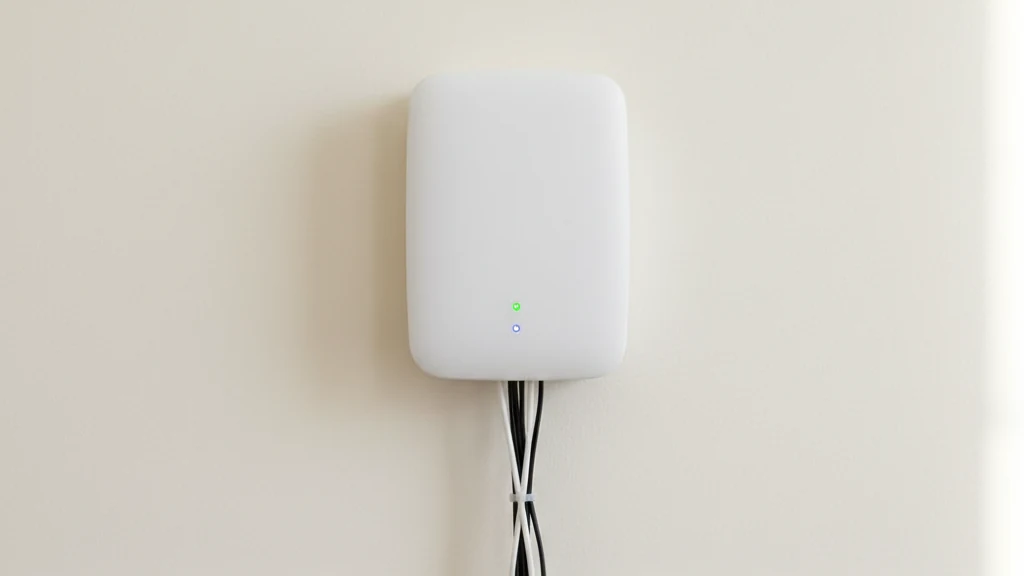
The white box on the wall is called an NTD (network termination device) or sometimes an ONT (optical network terminal). It’s the fibre’s last stop before your home network starts. The fibre cable from the street runs into it, your router plugs into one of its LAN ports, and the lights on the front tell you whether everything’s working.
The short version
| What | Who does it | How long |
|---|---|---|
| Order an FTTP plan | You, online | 5 min |
| NBN Co books install appointment | NBN Co contacts you | 1–10 days wait |
| Run fibre from street + mount NTD | NBN technician | 2–4 hours, you home |
| Test signal + show you the lights | NBN technician | 30–60 min |
| Activate the service | Your ISP, remotely | Same day to 24 hours |
| Plug your router into LAN 1 | You | 5–15 min |
What an FTTP install day actually looks like
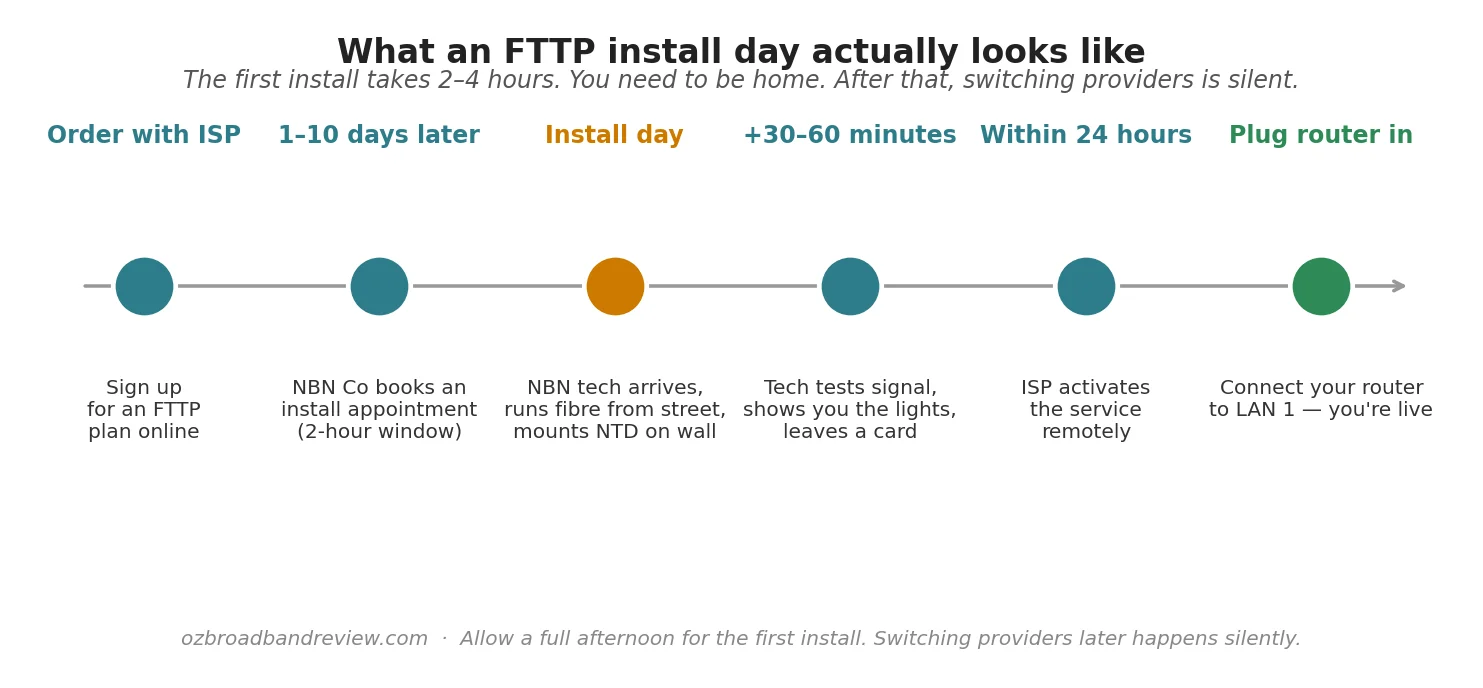
Once you order an FTTP plan with your chosen ISP (Aussie Broadband, Telstra, Superloop, Exetel, whoever), the ISP submits the activation request to NBN Co. NBN Co then contacts you to book a technician appointment, usually within a week or two, sometimes longer in busy regional areas. They’ll give you a 2-hour arrival window.
You need to be home for the install. The technician will:
- Walk around the front of the house to find the fibre lead-in (often a small black or grey conduit running from the street to an exterior junction)
- Run the fibre cable from there into the house, usually punching a small hole through an exterior wall or routing it through an existing entry point
- Mount the NTD on an interior wall — typically in an entrance hallway, the garage, or a study cupboard. They’ll usually ask you where you want it
- Connect the fibre to the NTD, plug in the power adapter, and wait for the lights to settle
- Run a test handset to confirm the connection is live
- Hand you a slip of paper with the activation reference and leave
The whole install usually takes 2–4 hours depending on how much external work is needed. Brand-new houses pre-wired for fibre take 1–2 hours. Older houses where they’re running new conduit can take longer.
Choosing where the NTD goes
The technician will usually let you pick the wall, within reason. The constraints:
- It needs a powerpoint within a metre or two
- It needs to be on an interior wall (out of the weather)
- It needs to be roughly along the path where the fibre enters the house — too far and they need more cable / more conduit / more drilling
- It should be where you can run an Ethernet cable from it to wherever your router will live
Most Australian homes end up with the NTD in an entrance hallway, near the front door (where the fibre lead-in usually is) or in a garage or laundry. A study or media cupboard is also fine if it’s close to the entry point. If you’re picky about how it looks, the entrance hall is usually the cleanest spot. The box can sit flat against the wall and the cables can run down behind the skirting.
The NTD up close
The NTD itself is a white plastic box roughly the size of a hardback book. About 20 cm tall, 13 cm wide, 4 cm deep. It’s wall-mounted with two screws and the back of the box snaps onto a mounting plate.
On the bottom or front edge you’ll find:
- Fibre port — the optical input. Already connected by the tech, don’t unplug it.
- Power port — round 12 V DC connector, plugs into the power adapter
- LAN 1 — this is where you plug your router. The default and only one you’ll need for normal home use.
- LAN 2 / 3 / 4 — only used if you have a multi-port NBN service (rare for home users)
- UNI-V — phone port. Only relevant if you have an NBN phone service through your ISP.
- Reset — a small recessed button. Don’t press this — it’s for NBN Co’s diagnostics, not customer use.
Some older installs include a Battery Backup Unit (BBU), a separate plastic box mounted next to the NTD with a lead-acid battery that kept the phone working during a blackout. Modern installs (2023+) skip the BBU entirely because hardly anyone uses NBN phone any more. If yours has one and it’s making chirping noises, it usually just needs the battery replaced or removed, call your ISP first to confirm whether you need it.
Reading the LED lights
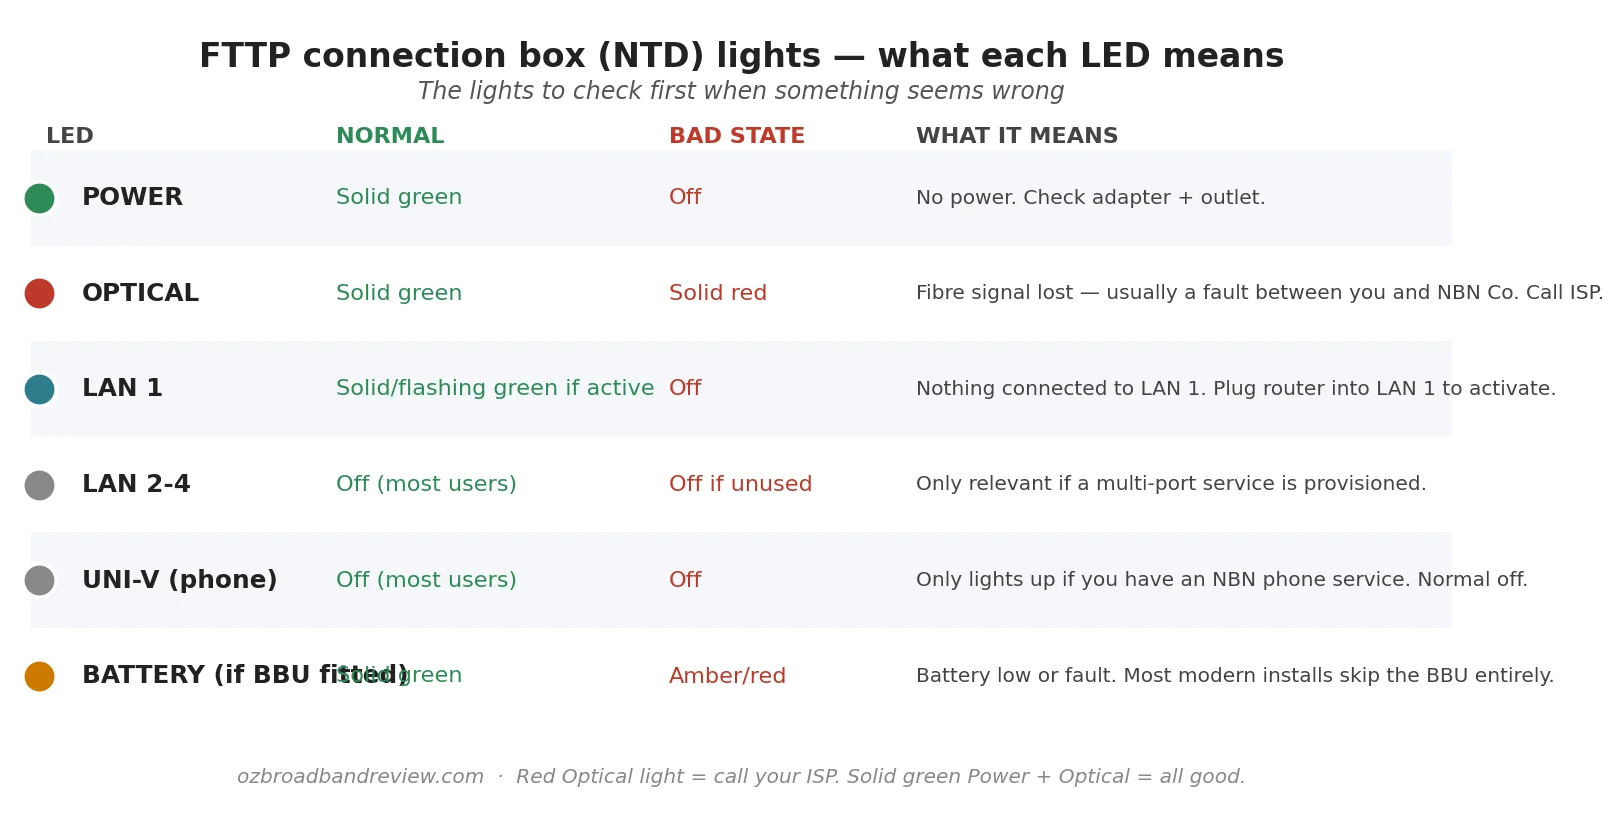
On a healthy FTTP NTD, you should see:
- POWER — solid green
- OPTICAL — solid green
- LAN 1 — solid or flashing green when your router is plugged in and active
- Everything else — off (most home users won’t have phone or multi-LAN services)
The light to watch for is OPTICAL. If it goes red, the fibre signal is lost, usually a fault somewhere between your house and the NBN Co exchange. There’s nothing you can do about it from your end. Call your ISP and they’ll raise a fault with NBN Co. If POWER is off, check the adapter is plugged in and the powerpoint is on at the wall. If LAN 1 is off when your router is plugged in, swap the Ethernet cable and check the router is powered on.
Connecting your router after install
Once the technician has left and the OPTICAL light is solid green, plug one end of an Ethernet cable into LAN 1 on the NTD and the other end into the WAN port (sometimes labelled “Internet”) on your router. Power the router up and wait a couple of minutes for it to negotiate with your ISP.
If your ISP supplied a modem, it usually comes pre-configured with your account details, you don’t need to do anything. If you’re bringing your own router (BYO modem), you’ll need to enter your ISP’s PPPoE or DHCP credentials. We’ve gone deep on this in BYO modem setup for NBN, that page covers the exact settings for Aussie Broadband, Telstra, Optus, TPG, iiNet, Superloop, Tangerine, Mate, Exetel, Vodafone and Dodo.
For Cat 6 vs Cat 6a Ethernet cable choices and run-length planning, see our Ethernet cables for NBN page.
Troubleshooting an FTTP install that won’t come online
Power LED off
Check the power adapter is firmly plugged into both the NTD and the wall. Check the wall switch is on. If all that looks right and the LED is still off, the power adapter has probably failed. Call your ISP for a replacement.
Optical LED red
The fibre signal is lost. This is almost always a fault on the NBN Co side and not something you can fix at home. Call your ISP. They’ll usually escalate it to NBN Co and you’ll have a tech booked within a day or two. If it’s a widespread outage, the ISP will already know about it. Check their status page or the NBN outage checker first to see if it’s a known issue.
LAN 1 off when router is plugged in
The Ethernet cable is the most common culprit. Swap it for a known-good Cat 5e or Cat 6 cable. If still no light, try a different LAN port on the router (router side, not NTD side). If still nothing, the issue is likely with the router itself.
Lights all look good but no internet
The most common reason: the ISP hasn’t activated the service yet. The activation can take up to 24 hours after the tech leaves. If it’s been longer than that, the issue is on the ISP side. Check that you’ve entered the right account details on the router, then call them. The wider troubleshooting walk-through is in what to do if my NBN stops working.
Can I move the FTTP box later?
Yes, but not yourself. NBN Co considers the NTD their equipment and they don’t want you opening it up or running new fibre cable inside the house. If you want to relocate the box (renovating, the box ended up in a stupid spot, you’ve changed how the house is laid out), the process is:
- Contact your ISP and request an NTD relocation
- NBN Co quotes a fee (typically $300–500 depending on the work involved)
- A technician visits, runs new internal fibre, and remounts the NTD in the new location
What you can do yourself: run a long Ethernet cable from LAN 1 to wherever you want your router to be. That’s not moving the NTD, it’s just running a longer cable, and it doesn’t need NBN Co’s involvement. Cat 6 cable handles a 25-metre run without issue.
What if the NTD dies?
NTDs are surprisingly durable. They’re solid-state electronics with no moving parts and no fan. Most last a decade or more without trouble. If yours does fail (no power LED even with a known-good adapter, no optical LED with a confirmed-good fibre), call your ISP. They’ll arrange a replacement with NBN Co at no charge if it’s a hardware fault. The replacement is usually done in a single tech visit and takes under an hour because the fibre run is already in place.
Frequently asked questions
Do I need to be home for an FTTP install?
Yes. The NBN technician needs access to the inside of the house to run the fibre cable and mount the NTD on an interior wall. They’ll book a 2-hour appointment window with you, usually 1–2 weeks out from when you order the plan. After this initial install, switching ISPs or upgrading speed tiers doesn’t require another tech visit. Those changes happen remotely.
How long does an FTTP install take?
Allow 2–4 hours for the install itself. Brand-new homes pre-wired for fibre are at the quicker end. Older houses where the technician has to run new conduit are at the longer end. The technician will arrive within the booked 2-hour window and the actual work usually takes 1–3 hours after that.
What do the lights on the FTTP box mean?
On a healthy NTD, POWER is solid green, OPTICAL is solid green, and LAN 1 is solid or flashing green once your router is connected. Everything else is normally off. The one that matters most is OPTICAL. If it turns red, the fibre signal is lost and that’s an NBN Co fault to escalate via your ISP.
What’s the difference between FTTP, NTD and ONT?
FTTP is the connection type, fibre-to-the-premises, the highest tier NBN technology. The NTD (network termination device) and ONT (optical network terminal) are two names for the same physical box on your wall, Australian NBN Co documentation calls it NTD; international fibre standards call it ONT. They’re the same thing. Most Australians just call it “the NBN box”.
Can I install the FTTP box myself?
No. The initial fibre run from the street into your house has to be done by an NBN Co technician. The fibre cable, the NTD, and the splicing equipment are all NBN Co’s. After the initial install, you handle the home networking side, running an Ethernet cable to your router, configuring the router, but the NTD itself stays where the tech put it and is NBN Co property.
Can I move the NTD to a different room?
Yes, but you need NBN Co to do the work and there’s a fee (typically $300–500). Contact your ISP to arrange it. Most of the time it’s cheaper to just run a longer Ethernet cable from LAN 1 to wherever you want your router instead. Cat 6 handles a 25-metre run with no signal loss.
Which LAN port should I plug my router into?
LAN 1. For standard home FTTP service, only LAN 1 is enabled. LAN 2, 3 and 4 are reserved for multi-service installations (e.g. business plans with separate streams for data and phone). If you plug into the wrong port, nothing breaks but no internet connection will come up.
Why does my FTTP NTD have a battery backup?
Older installs (typically pre-2023) included a Battery Backup Unit (BBU) so the NBN phone service kept working during a power outage. Since NBN phone is rarely used now, modern installs skip the BBU entirely. If yours has one and it’s making noise, the battery is usually flat. Call your ISP about replacement or removal.
What if the install fails or there’s a fault?
If the technician can’t complete the install (most often because the fibre lead-in isn’t where it should be, or there’s a building access issue), they’ll reschedule and report back to NBN Co. If the install completes but the service won’t activate, the issue is usually on the ISP side. Call them and reference the activation slip the tech left you. If you’re stuck for more than a few days, the Telecommunications Industry Ombudsman handles unresolved install complaints.
Am I eligible for an FTTP upgrade if I currently have FTTN?
Most likely yes. NBN Co has been offering free FTTP upgrades to FTTN served addresses since 2022. You just need to sign up to an NBN 100 or higher plan with a participating ISP. The ISP submits the upgrade request, NBN Co books the install, and the FTTP install runs exactly as described in this guide. No upgrade fee in most cases. Check your address eligibility on the NBN Co site or ask your ISP.