Last updated: 18 May 2026
Slow Wi-Fi is one of the most common complaints we hear, and almost every time it turns out the NBN plan is fine. The bottleneck is somewhere inside the house. Bad router placement, an outdated router, a microwave near your laptop, neighbours hammering the same channel as you. Here are the 10 most common Wi-Fi killers in Australian homes in 2026, ranked roughly by how often they’re the actual culprit.
First — confirm it’s actually a Wi-Fi problem
Before you blame Wi-Fi, run a 30-second speed test on Ethernet (a laptop plugged directly into your modem with a cable). If your Ethernet speed is close to your plan, the line is fine and the Wi-Fi is the bottleneck. If Ethernet is also slow, the problem is your NBN line or provider. Different fix.
Now to the fixes.
1. Bad router placement
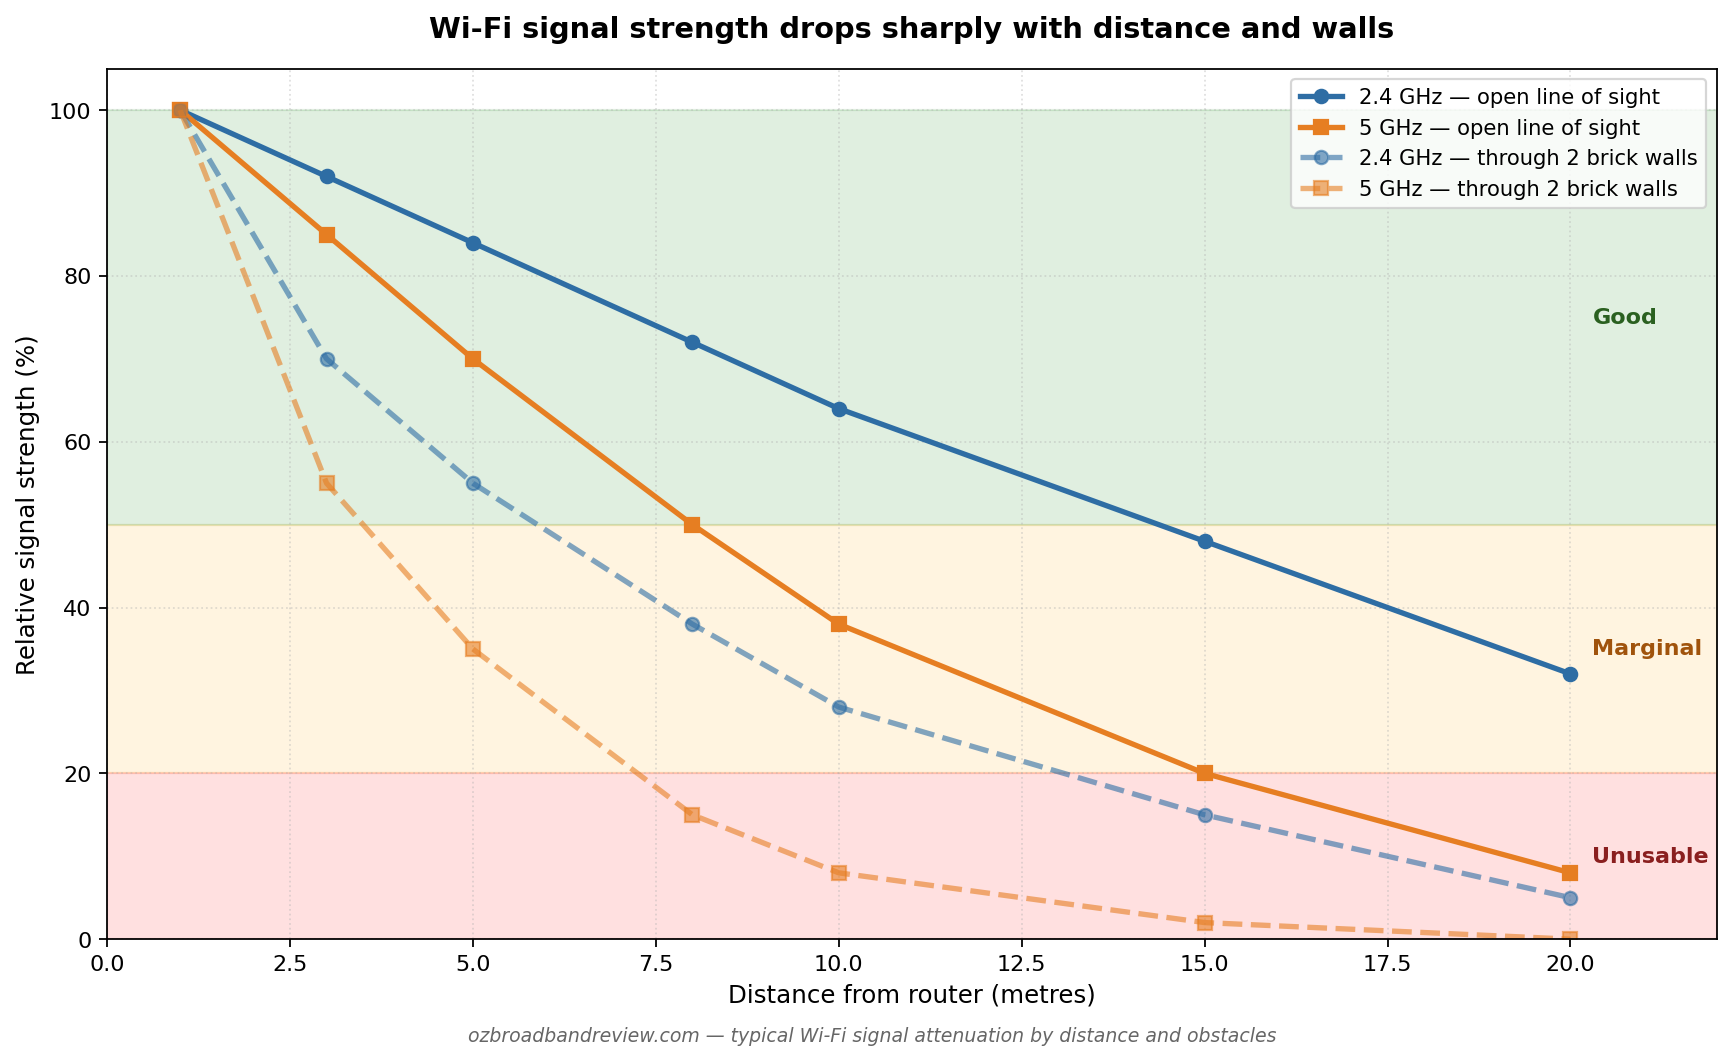
The single most common cause. Wi-Fi signal weakens significantly over distance and gets blocked by physical objects. Walls, appliances, furniture, even a fish tank (water is one of the worst Wi-Fi blockers there is). If your router is in the corner of the lounge tucked behind the TV, the bedroom at the back of the house is going to suffer.
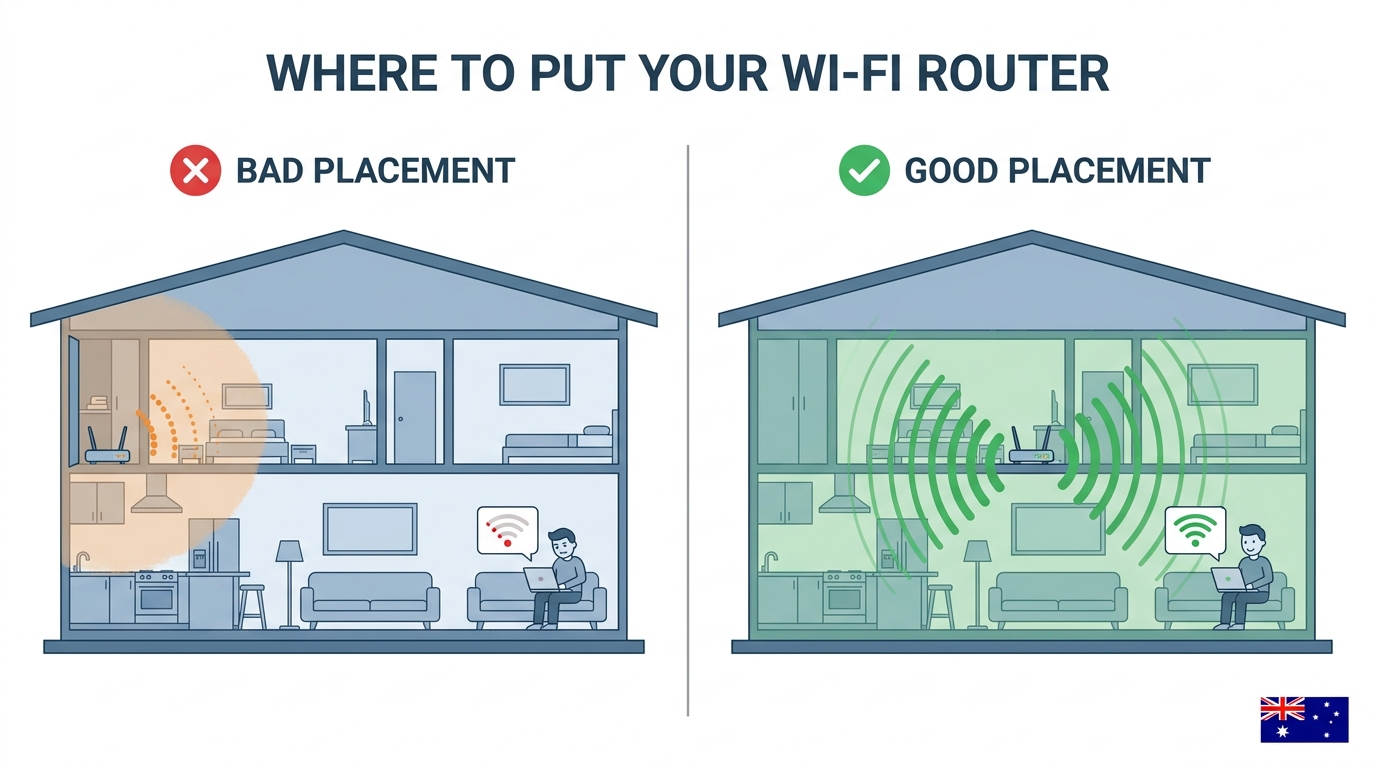
- Centre of the house, not a corner. Wi-Fi radiates in all directions, so half a corner router’s signal is going outside.
- Elevated, not on the floor. Shelf-height or wall-mounted is ideal — signal goes outwards and slightly downwards from the antennas.
- Out in the open. Not inside a cupboard, not behind the TV, not tucked behind a desk. Every solid object between the router and your device costs signal.
- Away from metal and water. Metal filing cabinets, fridges and fish tanks absorb 2.4 GHz badly.
2. Using the wrong frequency band (2.4 GHz vs 5 GHz vs 6 GHz)
Most modern routers broadcast on two or three bands. Each is suited to a different use:
| Band | Best for | Range | Speed |
|---|---|---|---|
| 2.4 GHz | Devices far from the router, IoT (smart plugs, doorbells) | Longest — goes through walls best | Slowest (~75-150 Mbps real-world) |
| 5 GHz | Phones, laptops, TVs in the same room as the router | Medium — blocked by walls more | Fast (~400-800 Mbps real-world) |
| 6 GHz (Wi-Fi 6E and later) | Modern phones and laptops within line-of-sight | Shortest — single-room range | Fastest (~800-1500+ Mbps real-world) |
Most modern routers run “band steering” which automatically moves devices to the best band. But if you have an old router or you’ve manually pinned a device to one band, you might be sending traffic the wrong way. Check your router’s app or admin page. If you see your phone connected on 2.4 GHz when you’re in the same room as the router, switch it to 5 GHz for a 3-5x speed jump.
3. Outdated router (Wi-Fi 5 or older)
If you’ve had the same router for more than 5 years, it’s probably the bottleneck. The Wi-Fi standards have moved on a lot:
| Standard | Year | Top theoretical speed | Real-world household speed |
|---|---|---|---|
| Wi-Fi 4 (802.11n) | 2009 | 600 Mbps | ~50-150 Mbps |
| Wi-Fi 5 (802.11ac) | 2014 | 3.5 Gbps | ~200-500 Mbps |
| Wi-Fi 6 (802.11ax) | 2019 | 9.6 Gbps | ~400-900 Mbps |
| Wi-Fi 6E | 2021 | 9.6 Gbps + 6 GHz band | ~600-1200 Mbps |
| Wi-Fi 7 (802.11be) | 2024 | 46 Gbps | ~1-3 Gbps |
If you’re on NBN 100 or higher and your router is Wi-Fi 5 from before 2018, upgrading to a Wi-Fi 6 or Wi-Fi 6E router (around $150-300 for a decent one) will often give you a bigger speed bump than upgrading your NBN plan.
4. Channel interference from neighbours
If you live in an apartment block or close-set houses, the 2.4 GHz band is crowded. There are only 3 non-overlapping channels (1, 6, 11) and dozens of neighbouring routers competing for them. The result: your router’s signal is constantly interrupted by neighbouring signals on the same channel.
Two fixes:
- Switch to 5 GHz where possible (see fix 2). The 5 GHz band has 23 non-overlapping channels in Australia, so interference is much rarer.
- Manually pick a quieter 2.4 GHz channel. Use a Wi-Fi analyser app (Wi-Fi Analyzer on Android, AirPort Utility’s scan feature on iPhone) to see what channels your neighbours are using and pick a different one. Most routers default to channel 1, 6 or 11 — pick the least-used.
5. Other devices interfering with the signal
2.4 GHz Wi-Fi shares its frequency with a surprising number of household devices, most of which actively jam it:
- Microwave ovens (kill your Wi-Fi every time someone heats a coffee)
- Baby monitors and cordless phones on the older 2.4 GHz standards
- Bluetooth devices in heavy use (especially game controllers)
- Some older smart home devices and wireless cameras
If your Wi-Fi reliably drops out when someone uses the microwave, you’ve found it. Either move the router further from the kitchen, or move important devices onto the 5 GHz band which doesn’t share frequencies with these everyday appliances.
6. Out-of-date router firmware
Router manufacturers release firmware updates that fix security holes and performance bugs. Most modern routers auto-update, but older ones don’t, and a router on three-year-old firmware can be measurably slower than the same router on the current version. Log into your router (usually via 192.168.1.1 or its dedicated app) and check the firmware version. If updates are available, install them.
For brand specific instructions see our router firmware update guide.
7. Too many connected devices
A typical Australian household in 2026 has 15-25 connected devices. Phones, laptops, smart TVs, smart speakers, doorbells, lightbulbs, fridges, kids’ tablets, gaming consoles. Every one of them takes a slice of your router’s processing capacity, even if it’s just sitting idle.
Cheap or older routers cap out at handling about 30-50 simultaneous connections. Newer Wi-Fi 6 routers support 100+ with technologies like OFDMA that handle many devices in parallel. If your home is heavy on smart devices and your router is more than 3-4 years old, you might be hitting the device limit before the bandwidth limit.
Quick fix: turn off Wi-Fi on devices you’re not actively using. Better fix: upgrade to a Wi-Fi 6 router that handles many concurrent devices better.
8. Single router in a multi-storey or large home
A single Wi-Fi router can cover a small Australian apartment fine, but a double-storey house, anything over about 150 square metres, or a house with thick brick interior walls usually needs more than one access point.
Two options:
- Mesh network (e.g. Google Nest Wifi, eero, TP-Link Deco, Asus ZenWifi) — two or three nodes that hand off seamlessly as you move around the house. The proper answer for most homes that need coverage extension.
- Range extender — older, cheaper approach that repeats your existing signal. Works but typically halves bandwidth on the extended portion.
For the detailed comparison see our Wi-Fi range extender vs mesh network guide.
9. Modem and router need a restart
Sounds basic, works embarrassingly often. Routers and modems can drift into degraded states over weeks of uptime. Memory leaks, stuck connections, DNS issues. Power off both for 30 seconds, plug the modem back in first, wait two minutes for it to fully sync, then power on the router. About a third of “slow Wi-Fi” complaints are fixed by this alone. Make it a monthly routine.
10. Your plan or provider is the actual bottleneck
If you’ve worked through fixes 1-9 and the speeds are still bad, the problem isn’t your Wi-Fi setup. It’s the connection coming into the house. Run a speed test on Ethernet at 8am and 8pm. If your evening speed is way below your morning speed, you’re hitting peak hour congestion at your provider. Switching to a better provider (Aussie Broadband, Superloop and Swoop consistently top the ACCC’s evening speed report) often fixes the issue completely.
If both morning and evening speeds are well below what you’re paying for, ring your provider for a line test. They’ll dispatch an NBN technician at no cost if there’s a fault.
Best NBN plans for a Wi-Fi-heavy household
If you’ve concluded the plan is the limit, these are the best NBN plans for a typical busy Australian home:
These NBN plans are fast, have plenty of data and all receive excellent reviews from our members. They would be great plans for anyone wanting to work from home.

|
Everyday
25 Mb/s
Unlimited data
|
$72/mth | Go to site |

|
One Plan
500 Mb/s
Unlimited data
|
$80/mth | Go to site |
|
|
Extra Value
50 Mb/s
Unlimited data
|
$85/mth | Go to site |

|
Value
49 Mb/s
Unlimited data
|
$93/mth | Go to site |
|
|
Family
100 Mb/s
Unlimited data
|
$95/mth | Go to site |
| Click here to view more great value NBN internet plans for working from home | |||
Frequently asked questions
Why is my Wi-Fi so slow when my NBN plan is fast?
Almost always one of: bad router placement (the #1 cause), using the 2.4 GHz band when you should be on 5 GHz, an outdated router (Wi-Fi 5 or older), interference from a microwave or neighbour, or too many connected devices. Start by testing your speed on Ethernet. If Ethernet is fast and Wi-Fi is slow, the problem is in your house, not on your NBN line.
Where should I put my Wi-Fi router?
Central in the house, elevated (shelf height or wall-mounted), in the open (not in a cupboard or behind the TV), away from the kitchen (microwaves jam 2.4 GHz Wi-Fi), and away from large metal objects and fish tanks (both absorb signal). The goal is for the router to have a clear shot at every room you use the internet in.
Is 5 GHz Wi-Fi always better than 2.4 GHz?
No. 5 GHz is faster but has shorter range and is blocked by walls more easily. Use 5 GHz for devices in the same room or one room away from the router. Use 2.4 GHz for devices at the far end of the house, smart home devices (doorbells, plugs) that only need a little bandwidth, and anywhere the 5 GHz signal won’t reach reliably.
How do I know if I need a new router?
If your router is Wi-Fi 5 or older (any router from before 2019) and you’re on NBN 100 or higher, the router is probably bottlenecking your speed. A Wi-Fi 6 router (~$150-300 for a decent one) typically delivers 2-3x more real world speed than a 5-year-old Wi-Fi 5 router on the same connection.
Why does my Wi-Fi drop out when someone uses the microwave?
Microwaves leak energy at the same 2.4 GHz frequency as Wi-Fi. While the microwave is running, it jams nearby Wi-Fi signals on that band. Fix: switch your important devices (laptops, phones, TVs) to 5 GHz which the microwave doesn’t affect, or move the router further from the kitchen.
Do I need a mesh network or just a range extender?
For a multi-storey house or anything over about 150 square metres, a mesh network is the better answer. Devices roam between nodes seamlessly and you don’t lose bandwidth. A range extender is cheaper but typically halves your bandwidth on the extended portion. See our mesh vs extender deep dive.
How often should I restart my router?
Once a month is plenty for most people. If you’re seeing slowdowns more often than that, your router might be due for replacement rather than just a restart. The exception: after a power outage or thunderstorm, restart the modem then the router to be sure the connection re-syncs cleanly.
Will Wi-Fi 7 make a difference for me?
Only if you have NBN 1000 or higher and Wi-Fi 7 devices (compatible iPhones, latest Samsung phones, recent laptops). Wi-Fi 7 routers are still expensive in 2026 ($500+) and the speed advantage over Wi-Fi 6E only shows up on very high-end connections. For most Australian households on NBN 50 or NBN 100, Wi-Fi 6 or 6E is more than enough.
How can I see what’s slowing down my Wi-Fi?
Three useful tools: (1) a speed test on Ethernet vs Wi-Fi, gap = Wi-Fi problem, no gap = line problem. (2) A Wi-Fi analyser app (Wi-Fi Analyzer on Android, AirPort Utility on iPhone) shows your channel and neighbour interference. (3) Your router’s admin page often lists every connected device with its signal strength, devices with weak signal are dragging the whole network down.
Can my landlord stop me upgrading the router?
Only the modem (the NBN box). The router and Wi-Fi gear is yours. You can buy whatever Wi-Fi 6E mesh system you like and plug it into the NBN box. When you move out, take it with you. For more on the renter angle, see our internet for renters guide.